Scraping the Store
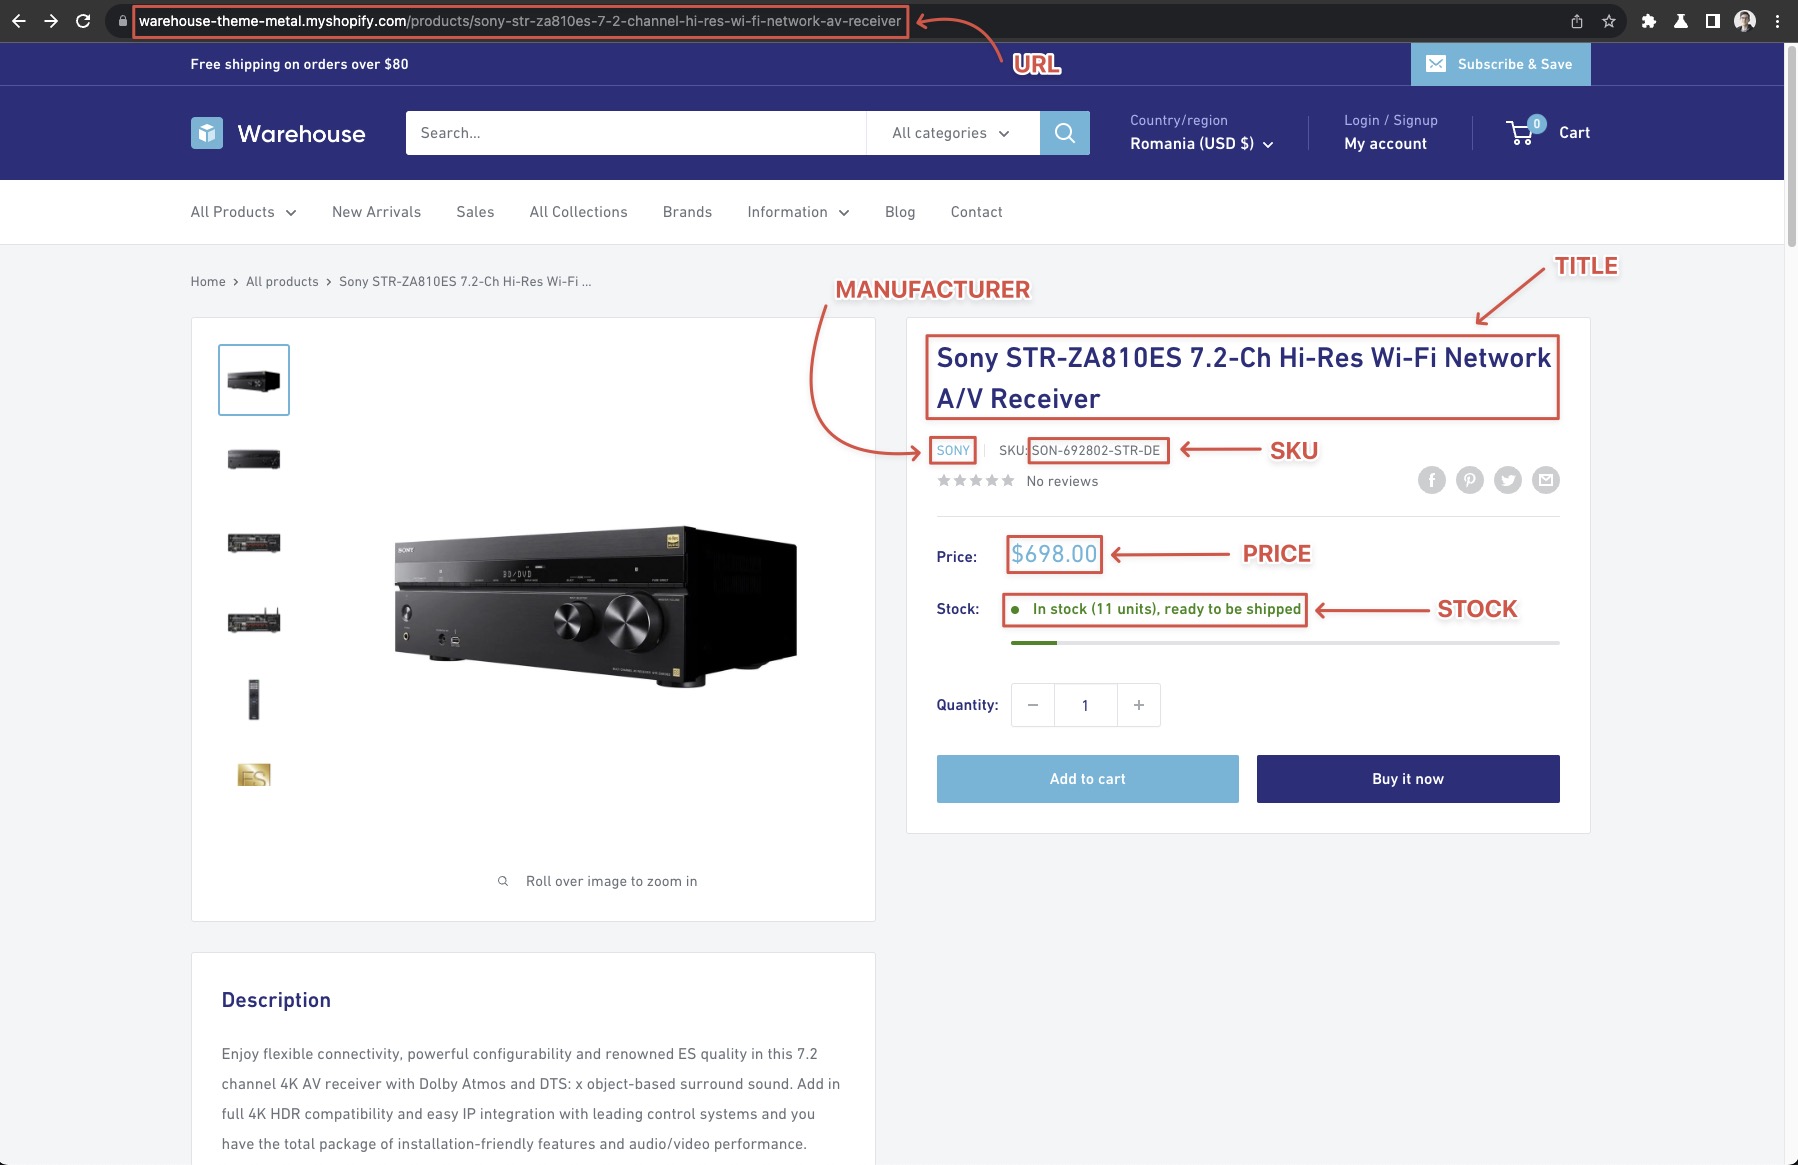
In the Real-world project chapter, you've created a list of the information you wanted to collect about the products in the example Warehouse store. Let's review that and figure out ways to access the data.
- URL
- Manufacturer
- SKU
- Title
- Current price
- Stock available

Scraping the URL, Manufacturer and SKU
Some information is lying right there in front of us without even having to touch the product detail pages. The URL we already have - the request.url. And by looking at it carefully, we realize that we can also extract the manufacturer from the URL (as all product urls start with /products/<manufacturer>). We can just split the string and be on our way then!
request.loaderUrl vs request.urlYou can use request.loadedUrl as well. Remember the difference: request.url is what you enqueue, request.loadedUrl is what gets processed (after possible redirects).
// request.url = https://warehouse-theme-metal.myshopify.com/products/sennheiser-mke-440-professional-stereo-shotgun-microphone-mke-440

const urlPart = request.url.split('/').slice(-1); // ['sennheiser-mke-440-professional-stereo-shotgun-microphone-mke-440']
const manufacturer = urlPart[0].split('-')[0]; // 'sennheiser'
It's a matter of preference, whether to store this information separately in the resulting dataset, or not. Whoever uses the dataset can easily parse the manufacturer from the URL, so should you duplicate the data unnecessarily? Our opinion is that unless the increased data consumption would be too large to bear, it's better to make the dataset as rich as possible. For example, someone might want to filter by manufacturer.
One thing you may notice is that the manufacturer might have a - in its name. If that's the case, your best bet is extracting it from the details page instead, but it's not mandatory. At the end of the day, you should always adjust and pick the best solution for your use case, and website you are crawling.
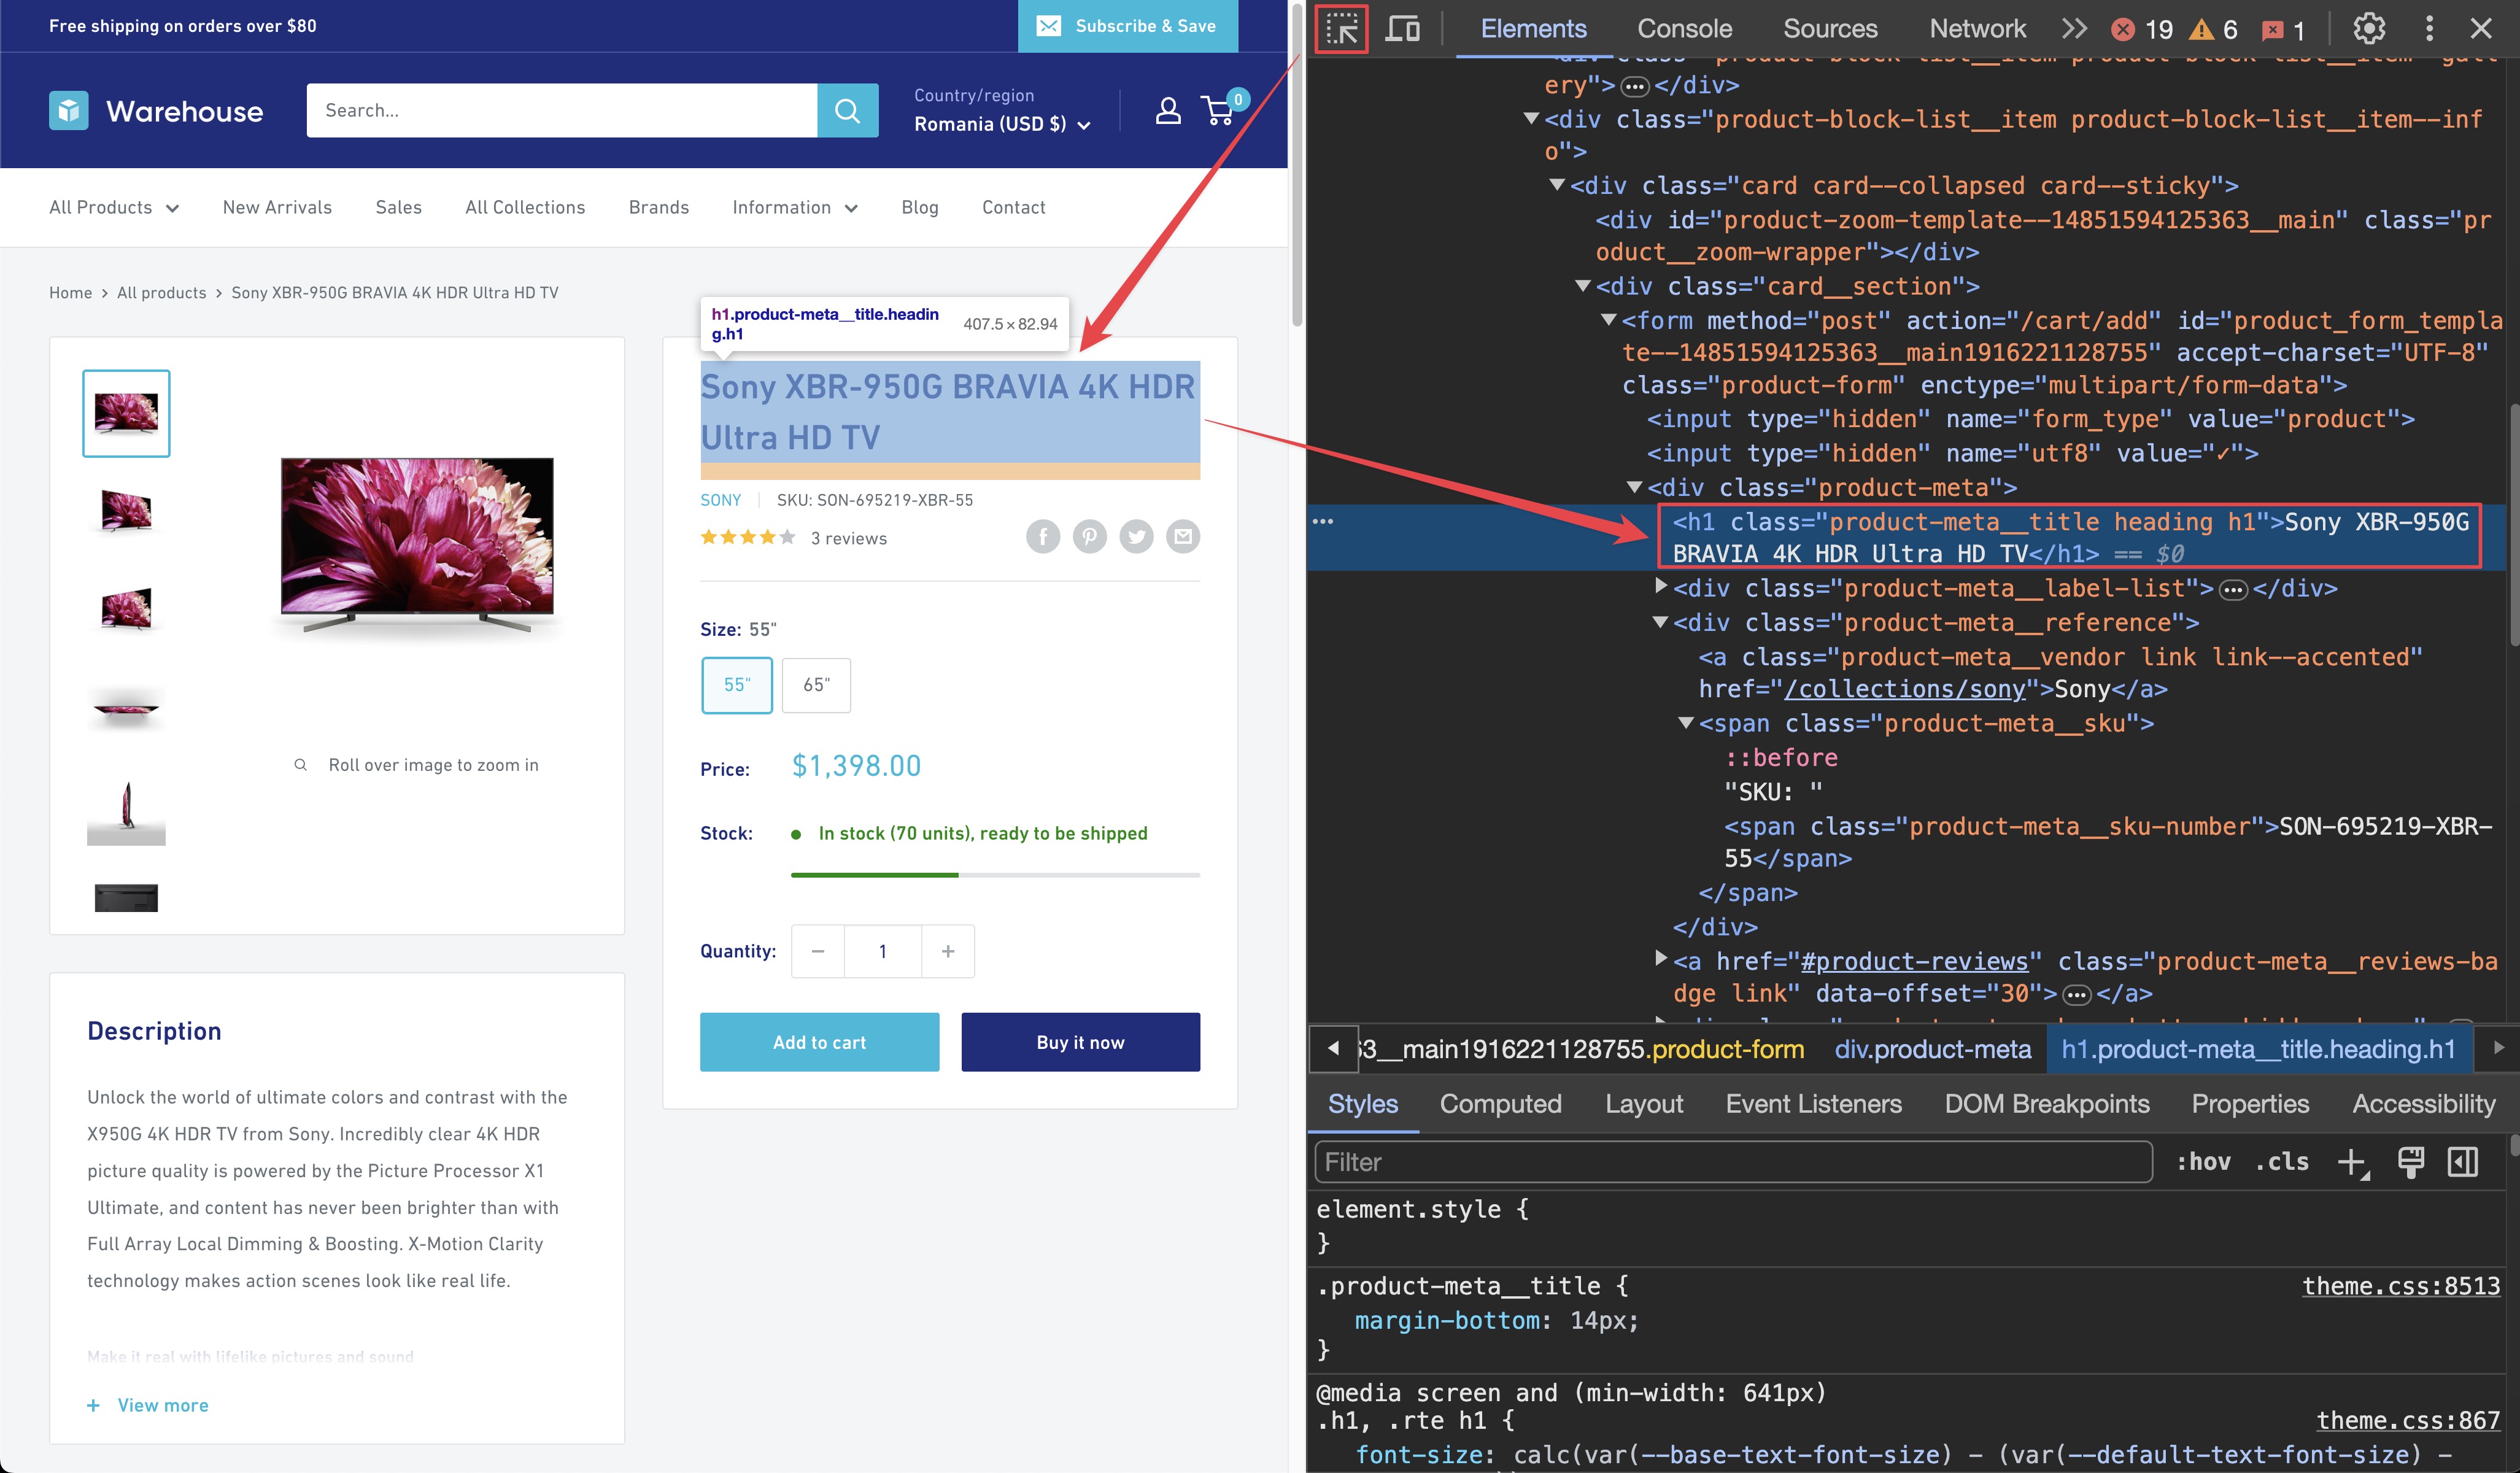
Now it's time to add more data to the results. Let's open one of the product detail pages, for example the Sony XBR-950G page and use our DevTools-Fu 🥋 to figure out how to get the title of the product.
Title

By using the element selector tool, you can see that the title is there under an <h1> tag, as titles should be. The <h1> tag is enclosed in a <div> with class product-meta. We can leverage this to create a combined selector .product-meta h1. It selects any <h1> element that is a child of a different element with the class product-meta.
Remember that you can press CTRL+F (or CMD+F on Mac) in the Elements tab of DevTools to open the search bar where you can quickly search for elements using their selectors. Always verify your scraping process and assumptions using the DevTools. It's faster than changing the crawler code all the time.
To get the title, you need to find it using Playwright and a .product-meta h1 locator, which selects the <h1> element you're looking for, or throws, if it finds more than one. That's good. It's usually better to crash the crawler than silently return bad data.
const title = await page.locator('.product-meta h1').textContent();
SKU
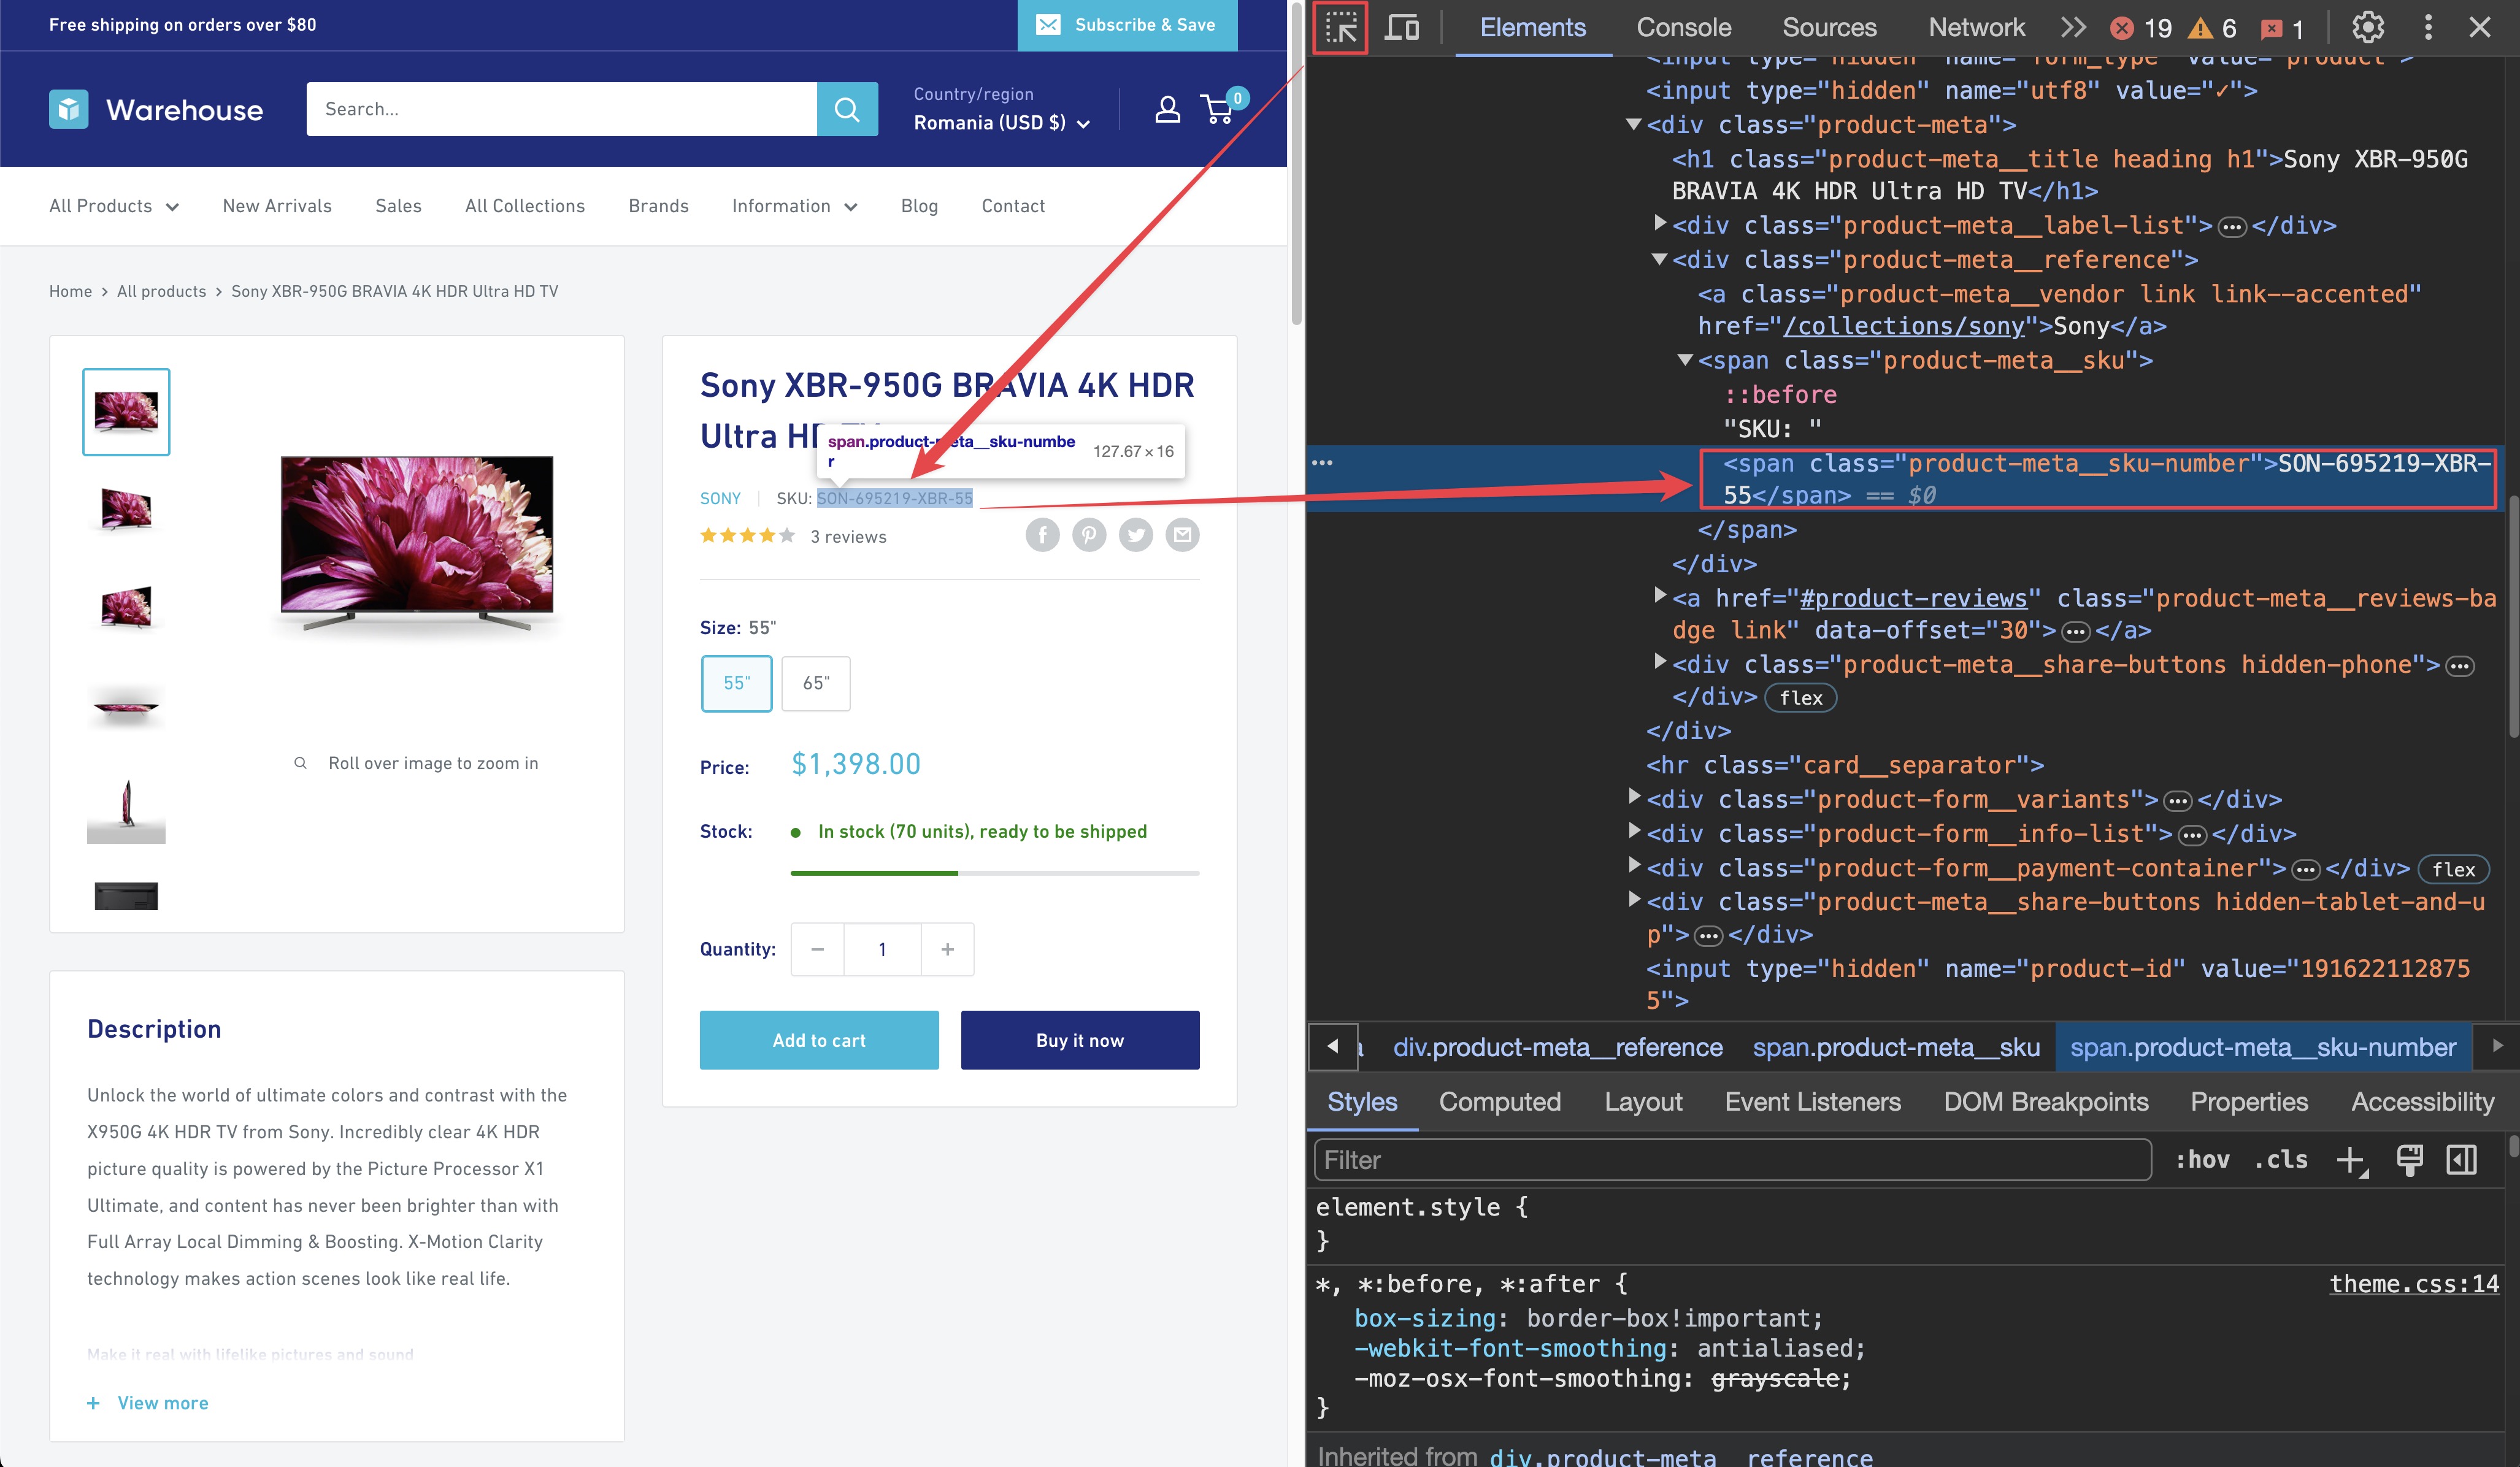
Using the DevTools, you can find that the product SKU is inside a <span> tag with a class product-meta__sku-number. And since there's no other <span> with that class on the page, you can safely use it.

const sku = await page.locator('span.product-meta__sku-number').textContent();
Current price
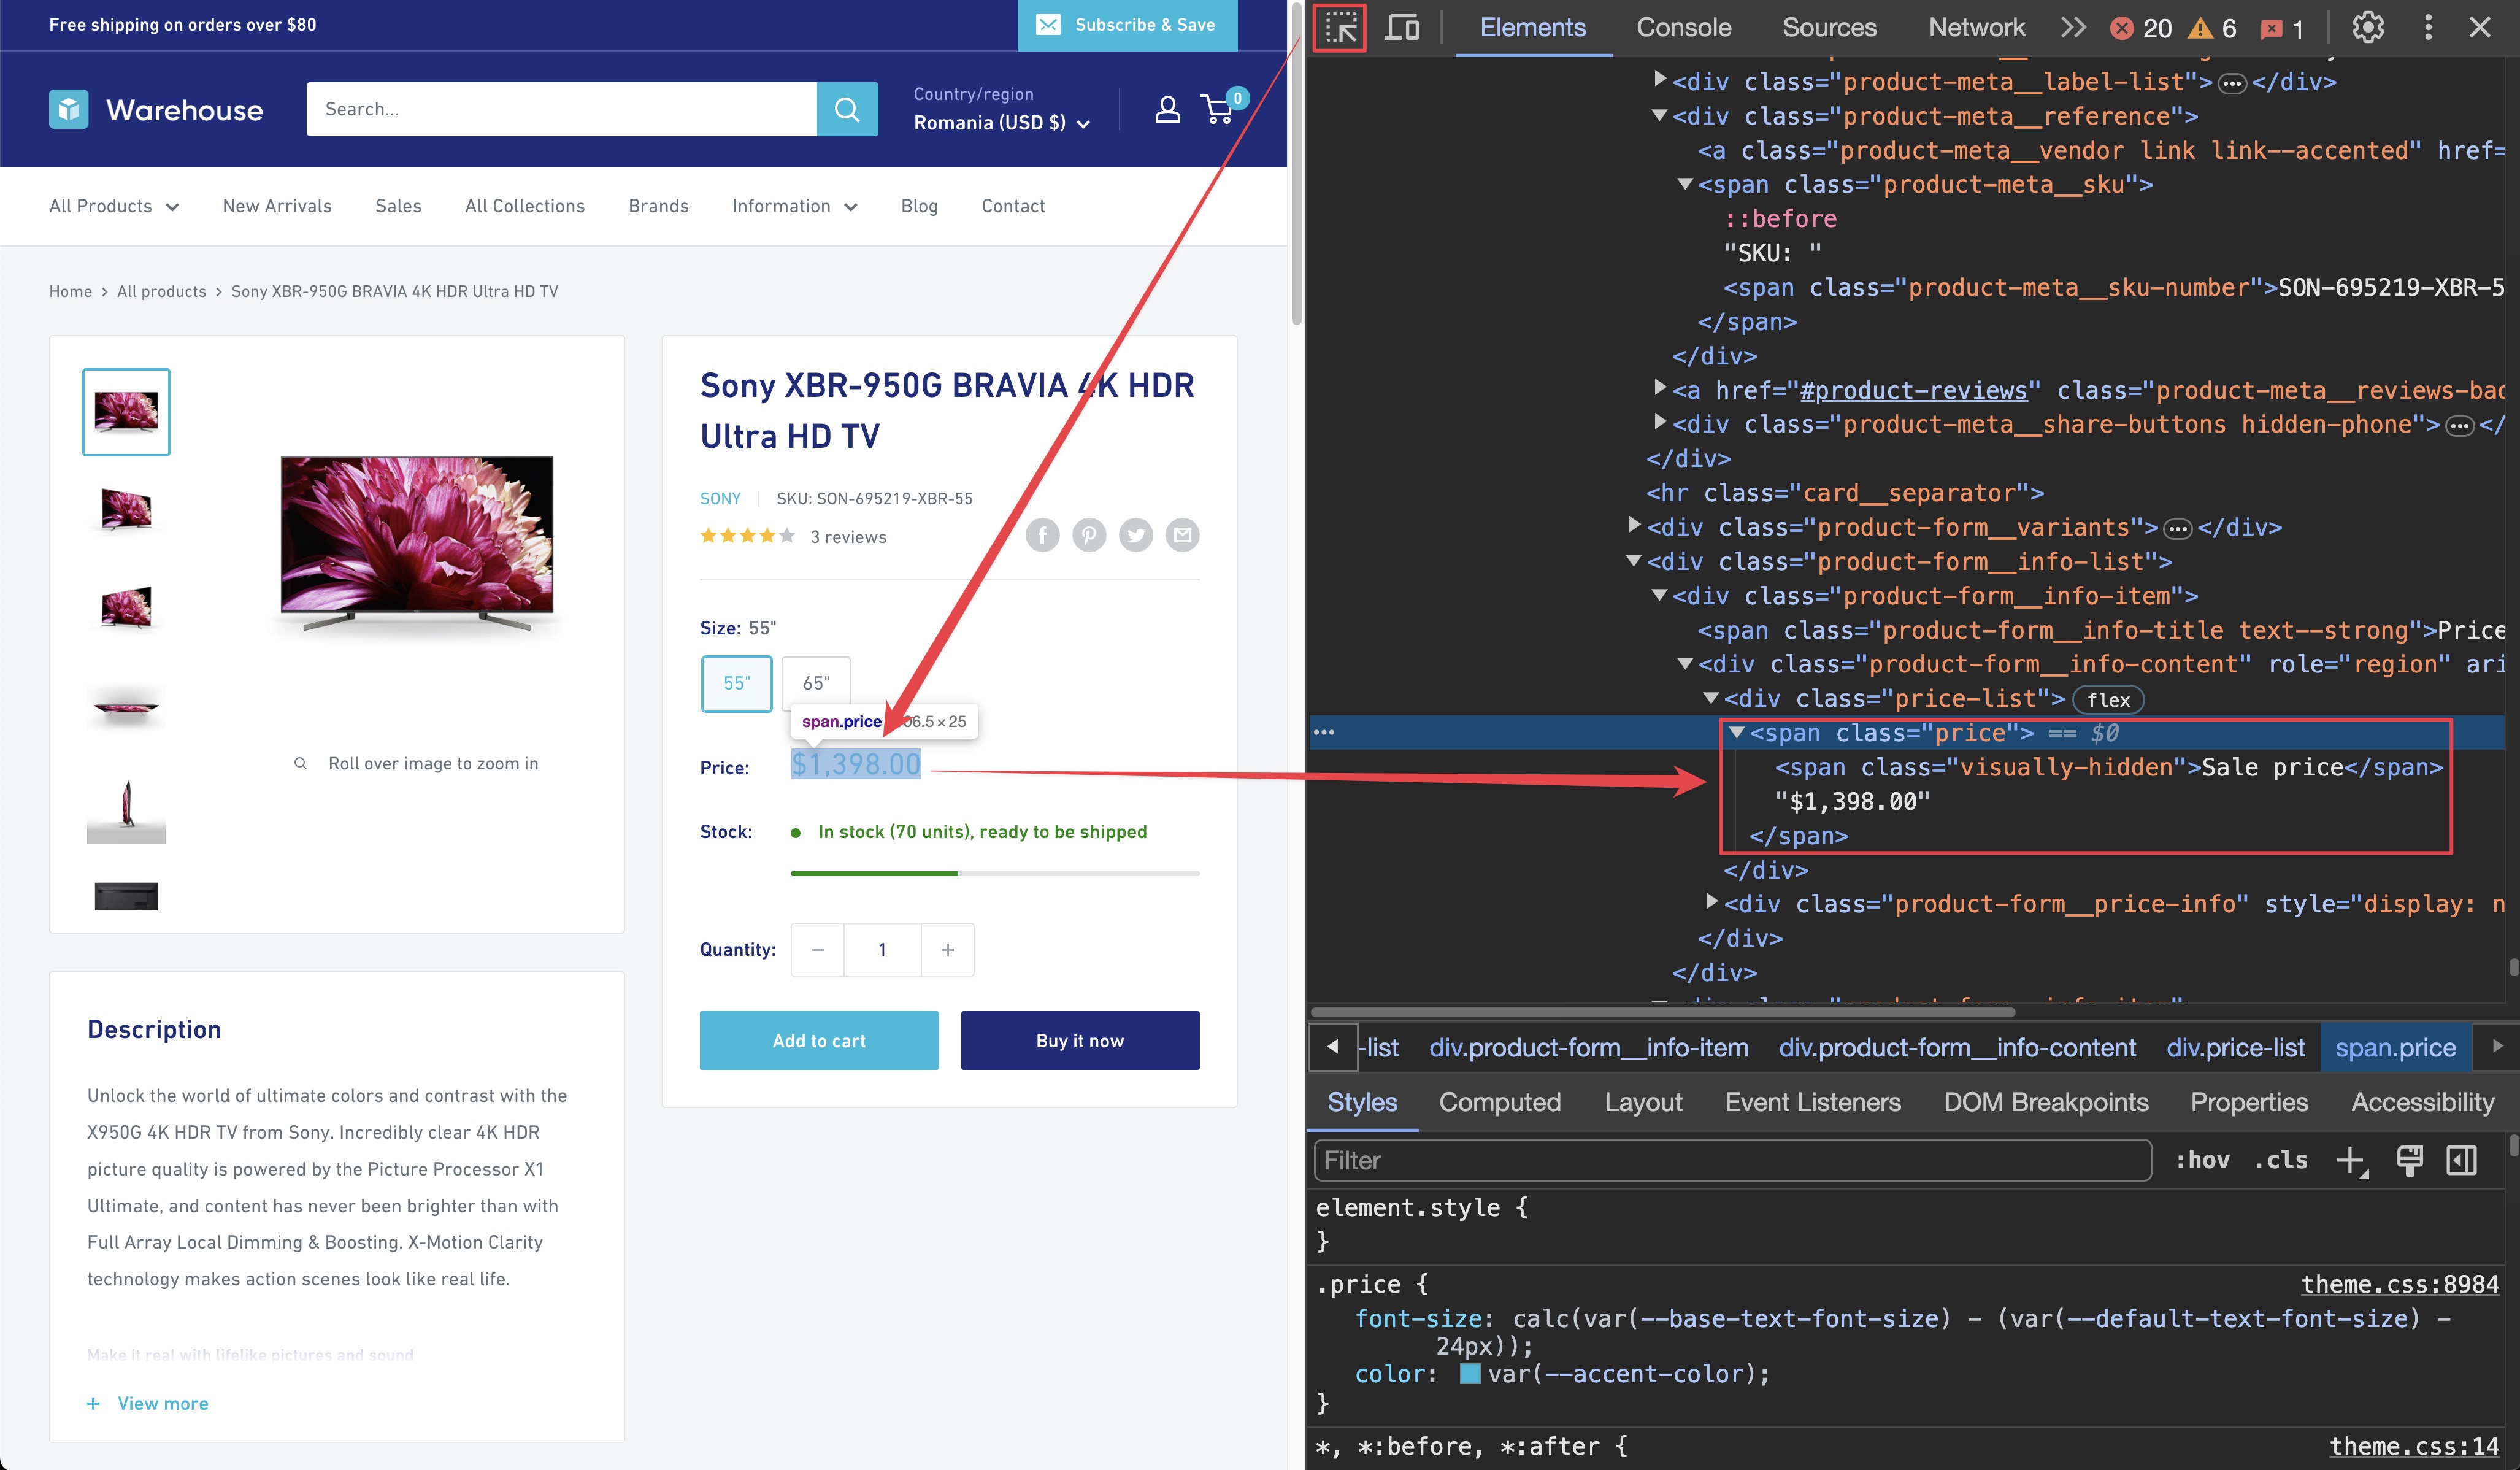
DevTools can tell you that the currentPrice can be found in a <span> element tagged with the price class. But it also shows that it is nested as raw text alongside another <span> element with the visually-hidden class. You don't want that, so you need to filter it out, and the hasText helper can be used for that for that.

const priceElement = page
    .locator('span.price')
    .filter({
        hasText: '$',
    })
    .first();

const currentPriceString = await priceElement.textContent();
const rawPrice = currentPriceString.split('$')[1];
const price = Number(rawPrice.replaceAll(',', ''));
It might look a little too complex at first glance, but let's walk through what you did. First off, you find the right part of the price span (specifically the actual price) by filtering the element that has the $ sign in it. When you do that, you will get a string similar to Sale price$1,398.00. This, by itself, is not that useful, so you extract the actual numeric part by splitting by the $ sign.
Once you do that, you receive a string that represents our price, but you will be converting it to a number. You do that by replacing all the commas with nothingness (so we can parse it into a number), then it is parsed into a number using Number().
Stock available
You're finishing up with the availableInStock. There is a span with the product-form__inventory class, and it contains the text In stock. You can use the hasText helper again to filter out the right element.
const inStockElement = await page
    .locator('span.product-form__inventory')
    .filter({
        hasText: 'In stock',
    })
    .first();

const inStock = (await inStockElement.count()) > 0;
For this, all that matter is whether the element exists or not, so you can use the count() method to check if there are any elements that match our selector. If there are, that means the product is in stock.
And there you have it! All the needed data. For the sake of completeness, let's add all the properties together, and you're good to go.
const urlPart = request.url.split('/').slice(-1); // ['sennheiser-mke-440-professional-stereo-shotgun-microphone-mke-440']
const manufacturer = urlPart.split('-')[0]; // 'sennheiser'

const title = await page.locator('.product-meta h1').textContent();
const sku = await page.locator('span.product-meta__sku-number').textContent();

const priceElement = page
    .locator('span.price')
    .filter({
        hasText: '$',
    })
    .first();

const currentPriceString = await priceElement.textContent();
const rawPrice = currentPriceString.split('$')[1];
const price = Number(rawPrice.replaceAll(',', ''));

const inStockElement = await page
    .locator('span.product-form__inventory')
    .filter({
        hasText: 'In stock',
    })
    .first();

const inStock = (await inStockElement.count()) > 0;
Trying it out
You have everything that is needed, so grab your newly created scraping logic, dump it into your original requestHandler() and see the magic happen!
import { PlaywrightCrawler } from 'crawlee';

const crawler = new PlaywrightCrawler({
    requestHandler: async ({ page, request, enqueueLinks }) => {
        console.log(`Processing: ${request.url}`);
        if (request.label === 'DETAIL') {
            const urlPart = request.url.split('/').slice(-1); // ['sennheiser-mke-440-professional-stereo-shotgun-microphone-mke-440']
            const manufacturer = urlPart[0].split('-')[0]; // 'sennheiser'

            const title = await page.locator('.product-meta h1').textContent();
            const sku = await page.locator('span.product-meta__sku-number').textContent();

            const priceElement = page
                .locator('span.price')
                .filter({
                    hasText: '$',
                })
                .first();

            const currentPriceString = await priceElement.textContent();
            const rawPrice = currentPriceString.split('$')[1];
            const price = Number(rawPrice.replaceAll(',', ''));

            const inStockElement = page
                .locator('span.product-form__inventory')
                .filter({
                    hasText: 'In stock',
                })
                .first();

            const inStock = (await inStockElement.count()) > 0;

            const results = {
                url: request.url,
                manufacturer,
                title,
                sku,
                currentPrice: price,
                availableInStock: inStock,
            };

            console.log(results);
        } else if (request.label === 'CATEGORY') {
            // We are now on a category page. We can use this to paginate through and enqueue all products,
            // as well as any subsequent pages we find

            await page.waitForSelector('.product-item > a');
            await enqueueLinks({
                selector: '.product-item > a',
                label: 'DETAIL', // <= note the different label
            });

            // Now we need to find the "Next" button and enqueue the next page of results (if it exists)
            const nextButton = await page.$('a.pagination__next');
            if (nextButton) {
                await enqueueLinks({
                    selector: 'a.pagination__next',
                    label: 'CATEGORY', // <= note the same label
                });
            }
        } else {
            // This means we're on the start page, with no label.
            // On this page, we just want to enqueue all the category pages.

            await page.waitForSelector('.collection-block-item');
            await enqueueLinks({
                selector: '.collection-block-item',
                label: 'CATEGORY',
            });
        }
    },

    // Let's limit our crawls to make our tests shorter and safer.
    maxRequestsPerCrawl: 50,
});

await crawler.run(['https://warehouse-theme-metal.myshopify.com/collections']);
When you run the crawler, you will see the crawled URLs and their scraped data printed to the console. The output will look something like this:
{
    "url": "https://warehouse-theme-metal.myshopify.com/products/sony-str-za810es-7-2-channel-hi-res-wi-fi-network-av-receiver",
    "manufacturer": "sony",
    "title": "Sony STR-ZA810ES 7.2-Ch Hi-Res Wi-Fi Network A/V Receiver",
    "sku": "SON-692802-STR-DE",
    "currentPrice": 698,
    "availableInStock": true
}
Next steps
Next, you'll see how to save the data you scraped to the disk for further processing.